Porsche Design
1. Screw-in setting crown
To ensure optimum water resistance, your P’6350|P’6351 Flat Six Automatic watch has a screw-in setting crown, which is handled as follows:
– To release the crown, unscrew it a few turns anti-clockwise.
– Once the crown is unscrewed you can make rapid date corrections and set the time precisely.
– To screw in the crown, press it gently against the case before turning it clockwise until it is fully screwed in.
-To screw in the crown [turning clockwise] To unscrew the crown [turning anti-clockwise]
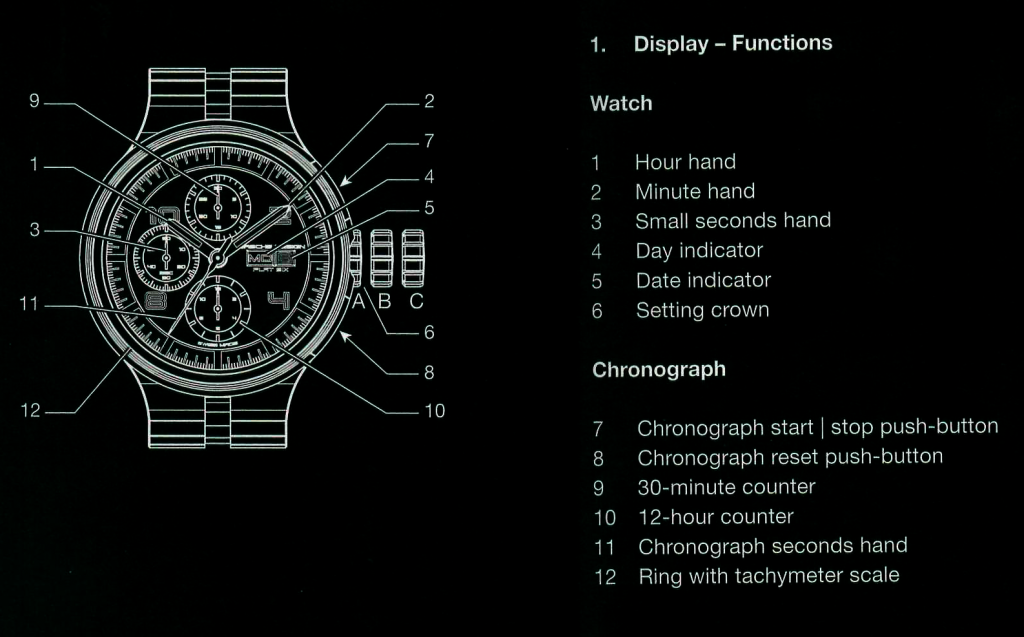
2. Settings
2.1. Preliminary notes
All watch settings first require the screw-in crown to be released. Once the setting has been made, push the crown back in against the case and screw it back in. Do not operate the crown underwater or when it is still wet.
The crown [5] has 3 positions:
[A] Rest and manual winding position
[B] Rapid date correction position
[C] Time-setting position with stop seconds and date change at midnight
2.2. Winding
Crown [5] in position [A], not pulled out Your watch has an automatic mechanical movement which is wound by the motion of your wrist when you are wearing the watch. It is therefore not normally necessary to manually wind the watch.
However, if your watch should stop, simply turn the crown [5] through a few turns clockwise to restart it. When fully wound, your watch has a power reserve of approximately 42 hours.
2.3. Rapid date correction
Crown [5] in position [B], intermediate Unscrew the crown [5] and pull it out one notch to position [B]. To correct the date, turn it clockwise until the desired date appears in the aperture [4] at 3 o’clock. Then push the crown back into the rest position [A] and screw it back in.
Note
During this operation your watch will continue to run normally, hence the time does not need to be corrected.
Important
Never correct the date between 8:00 p.m. and 2:00 a.m. The movement is in the date change process, and could be damaged.
2.4. Setting the time
Crown [5] in position [C], pulled out Unscrew the crown [5] and pull it out two notches to position [C]. The central seconds hand [3] will stop. Turn the crown in either direction to set the time. Then push it back into the rest position [A] and screw it back in. The central seconds hand [3] will restart. When the hour hand [1] passes the 12 o’clock position, you will know whether it is indicating midnight [the date changes] or midday [the date does not change]. Make sure that the previously set date has not changed.
Note
For a time setting accurate to the second, we recommend pulling the crown out to position [C] when the central seconds hand [3] is at precisely 12 o’clock, and pushing it back in to synchronise with an official time signal.
3. Chronograph functions
With the chronograph you can measure times of up to 12 hours, reading them directly on the dial.
3.1. Starting the chronograph
Pressing the push-button [7] at 2 o’clock starts the chronograph central seconds hand [11]. It completes a full turn of the dial in 60 seconds. The chronograph minute counter [9] at 12 o’clock records the time elapsed since starting, i.e. up to 30 minutes. The 12-hour counter [10] at 6 o’clock records the hours and half-hours elapsed since starting, i.e. up to 12 hours.
3.2. Stopping the chronograph
Pressing push-button [7] again stops the chronograph central seconds hand [11], enabling you to read the elapsed time.
3.3. Resetting the chronograph
Pressing the push-button [8] at 4 o’clock resets the chronograph, readying it for a new timing operation.
3.4. Successive timing operations [lap times]
To measure successive times, you need only activate and pause the chronograph at will using the push-button [7] at 2 o’clock. The corresponding hands are not reset, but restart directly from their stop position. The chronograph is reset using the push-button [8] at 4 o’clock.
3.5. Tachymeter scale
With the tachymeter scale you can measure an average speed over a distance of 1 kilometre. To do so: – Start timing by pressing push-button [7]. – After exactly 1 kilometre, stop timing by pressing push-button [7] again. – The chronograph central seconds hand [11] will indicate the average speed in kmlh on the tachymeter scale [12].
4. Important advice
4.1. Maintenance
Your new watch is a precision instrument which has been produced with the utmost care. The following advice is given to ensure that your watch retains its operating precision and brand new appearance for as long as possible. We recommend cleaning your watch regularly using a soft cloth and lukewarm soapy water. After bathing in the sea, rinse your watch with fresh water and allow it to dry completely. Avoid leaving your watch in places susceptible to high variations in temperature or humidity, bright sunlight or strong magnetic fields.
4.2. Water resistance
Your watch is guaranteed water-resistant to a depth of 100 m [10 ATM]. Nevertheless, it is important to understand that repeated handling of the case, the ageing of sealing components and major variations in temperature [from bright sunshine to cold water, for example] can compromise even the most water-resistant case.
Since water and moisture infiltration may lead to costly repairs, you are strongly advised to have your watch’s water resistance checked regularly by an authorised retailer or Porsche Design approved general agent. This check should be performed every year or whenever the watch has sustained an impact.
4.3. Servicing
Owing to the ageing of its oil and grease, the movement needs to be cleaned and overhauled approximately every four years to guarantee optimum operation. To ensure irreproachable maintenance service and safeguard the guarantee validity, always entrust your watch to an authorised retailer or Porsche Design approved general agent. For any questions, please contact your authorised Porsche Design retailer, or the Porsche Design approved general agent for your country. You can find the addresses and a host of information at:
www.porsche-design.com/timepieces